How to Get Google Assistant on Windows, macOS and Linux

Google Assistant – Google’s answer to all the AI assistants claiming to
be the best, is quite simply the best one there is right now. It’s not
perfect, not by far, but it does the job much better than the other
options. Which is why, when Google released Google Assistant on every
Android phone with Android 6.0 and above, it was such a huge deal.
Which is why it’s exciting that you can now get the Google Assistant
(sans the UI) on Windows, Mac and Linux as well. So, if that excites
you, and the fact that “sans the UI” means you’ll be using the Terminal
doesn’t scare you, here is how to get Google Assistant on
Windows, Mac, and Linux systems:
Prerequisites for the Google Assistant
Google Assistant – Google’s answer to all the AI assistants claiming to
be the best, is quite simply the best one there is right now. It’s not
perfect, not by far, but it does the job much better than the other
options. Which is why, when Google released Google Assistant on every
Android phone with Android 6.0 and above, it was such a huge deal.
Which is why it’s exciting that you can now get the Google Assistant
(sans the UI) on Windows, Mac and Linux as well. So, if that excites
you, and the fact that “sans the UI” means you’ll be using the Terminal
doesn’t scare you, here is how to get Google Assistant on
Windows, Mac, and Linux systems:
Prerequisites for the Google Assistant
Before you can get to running the Google Assistant service (thanks to Google releasing the Google Assistant API), you need to know a few things, and set up a few others:
- You will need to use the Terminal on macOS or Linux, and the Command Prompt on Windows, to set up and run the Google Assistant.
- You’ll need to have Python 3 installed on your system. While most Mac, and Linux systems come with Python preinstalled, it’s usually version 2.x. So, make sure you go to the Python website, and download Python 3.x for the purposes of this tutorial.Setting Up the Google Assistant API
Setting Up the Google Assistant API
Before you can use Google Assistant on your Windows, Mac, or Linux computer, you’ll have to configure the Google Assistant API. Simply follow the steps given below:
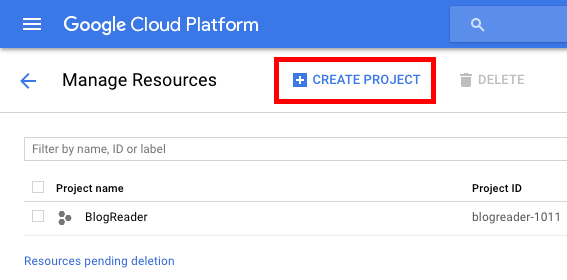
- Go to “Projects” in the Google Cloud Platform Console website, and click on “Create Project”.
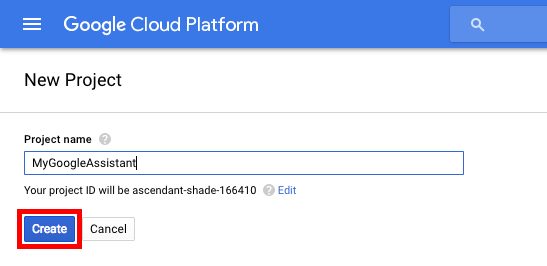
- Give your project an appropriate name. I used “My Google Assistant” as the name, but “Way Better than Siri” will work just as well. Then, click on “Create”.
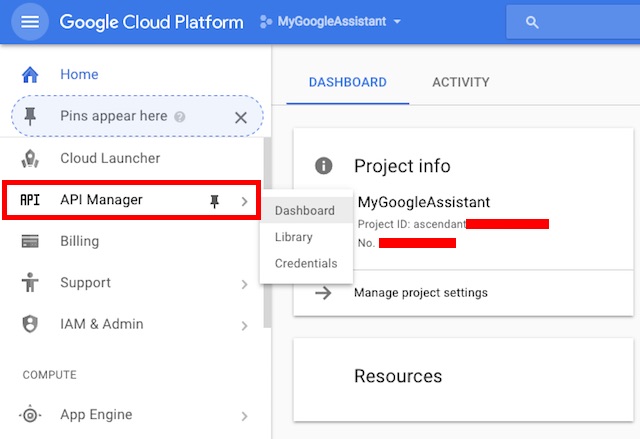
- The Cloud Platform Console will take some time to set up your project, and you’ll be able to see a progress circle in the top right. Once done, you can click on the “bell icon”, and then on the notification regarding your project.

- In the page that opens up, click on “API Manager”.
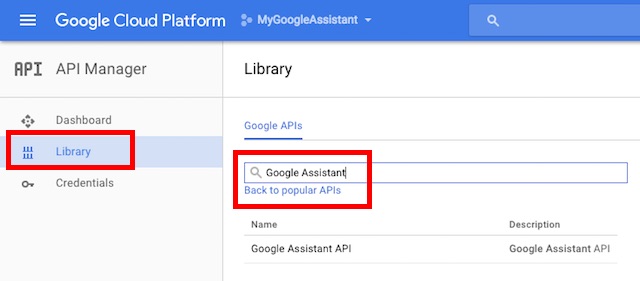
- Go to “Library”, and then search for “Google Assistant”.
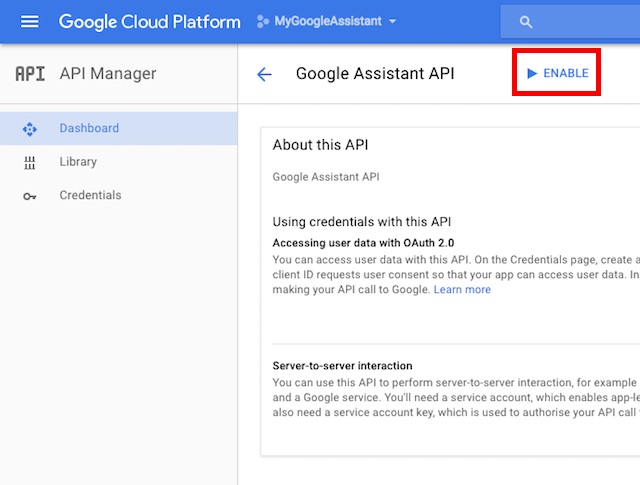
- Click on the “Google Assistant API” that shows up in the results, and then click on Enable.
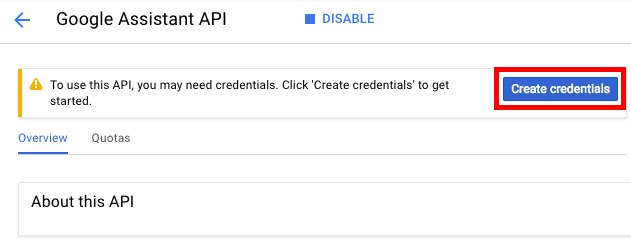
- Google will tell you that you may need credentials to use the API. Simply click on “Create credentials“.
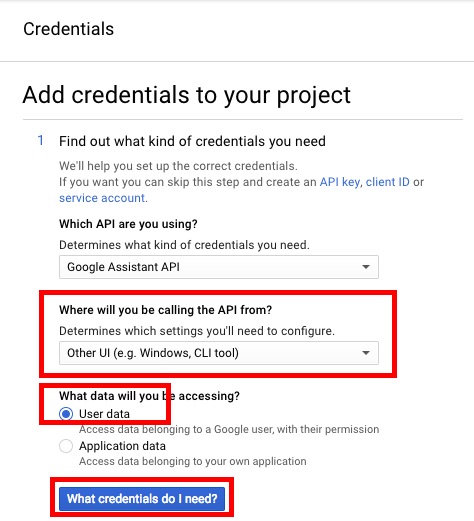
- In the form that opens up, choose “Other UI (eg Windows, CLI)” under “Where will you be calling the API from?“, and select “User Data” in “What data will you be accessing?“. Then click on “What credentials do I need?“.
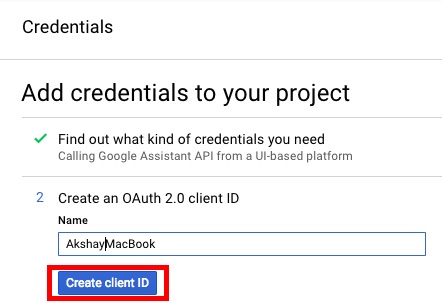
- Create a client ID. You can give it any name that you want. Once done, click on “Create client ID“.
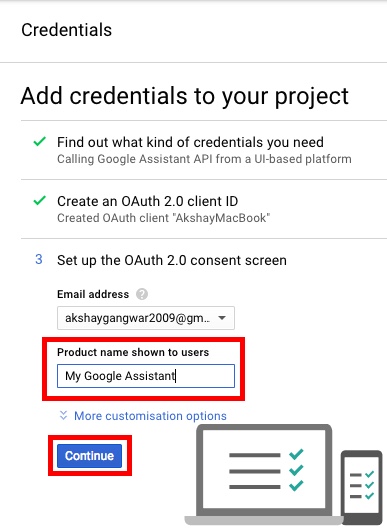
- In the next step, use the name of your project in the “Product name as shown to users“, and then click “Continue”.
- You’ll get the option to download the credentials. Click on “Done”. We’ll download the credentials later.

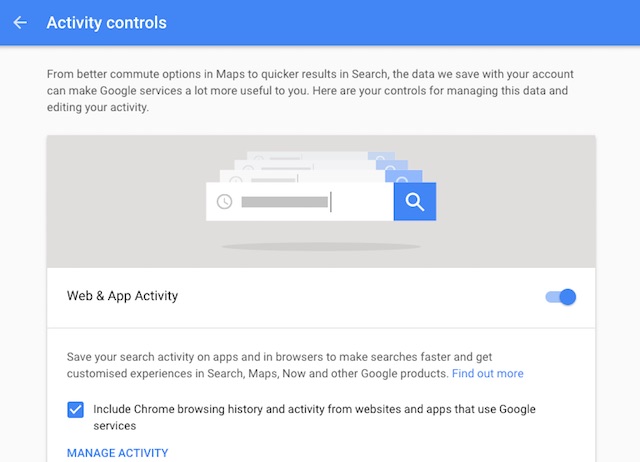
- Go to Activity Controls, and ensure that all the toggles are turned on. This is required for the Google Assistant to provide personalized responses.
- In the next screen, you’ll be able to see the client ID you created. Click on the download icon at the very right of the screen. This will download a JSON file to your computer. Save it somewhere you can easily get to. I saved it at “/Users/technoker/assistant/“.Install Google Assistant Sample Project.
Setting Up the Google Assistant API
Before you can use Google Assistant on your Windows, Mac, or Linux computer, you’ll have to configure the Google Assistant API. Simply follow the steps given below:
- Go to “Projects” in the Google Cloud Platform Console website, and click on “Create Project”.
- Give your project an appropriate name. I used “My Google Assistant” as the name, but “Way Better than Siri” will work just as well. Then, click on “Create”.
- The Cloud Platform Console will take some time to set up your project, and you’ll be able to see a progress circle in the top right. Once done, you can click on the “bell icon”, and then on the notification regarding your project.
- In the page that opens up, click on “API Manager”.
- Go to “Library”, and then search for “Google Assistant”.
- Click on the “Google Assistant API” that shows up in the results, and then click on Enable.
- Google will tell you that you may need credentials to use the API. Simply click on “Create credentials“.
- In the form that opens up, choose “Other UI (eg Windows, CLI)” under “Where will you be calling the API from?“, and select “User Data” in “What data will you be accessing?“. Then click on “What credentials do I need?“.
- Create a client ID. You can give it any name that you want. Once done, click on “Create client ID“.
- In the next step, use the name of your project in the “Product name as shown to users“, and then click “Continue”.
- You’ll get the option to download the credentials. Click on “Done”. We’ll download the credentials later.
- Go to Activity Controls, and ensure that all the toggles are turned on. This is required for the Google Assistant to provide personalized responses.
- In the next screen, you’ll be able to see the client ID you created. Click on the download icon at the very right of the screen. This will download a JSON file to your computer. Save it somewhere you can easily get to. I saved it at “/Users/technoker/assistant/“.Install Google Assistant Sample Project.
Install Google Assistant Sample Project
- Launch the Terminal (Command Prompt on Windows), and type the following command:
python3 -m pip install google-assistant-sdk[samples]

- Once the command completes, type the following command:
python3 -m googlesamples.assistant.auth_helpers --client-secrets "path_to_the_downloaded_JSON_file"

- You will get a URL as the output in the Terminal. Navigate to this URL in your browser, copy and paste the confirmation code from the webpage into the Terminal, and press Enter.
Install Google Assistant Sample Project
- Launch the Terminal (Command Prompt on Windows), and type the following command:
python3 -m pip install google-assistant-sdk[samples]
- Once the command completes, type the following command:
python3 -m googlesamples.assistant.auth_helpers --client-secrets "path_to_the_downloaded_JSON_file"
- You will get a URL as the output in the Terminal. Navigate to this URL in your browser, copy and paste the confirmation code from the webpage into the Terminal, and press Enter.
Use Google Assistant on Windows , Mac and Linux
Now that you’ve done all the required set up, it’s time to test the Google Assistant, and begin using it.
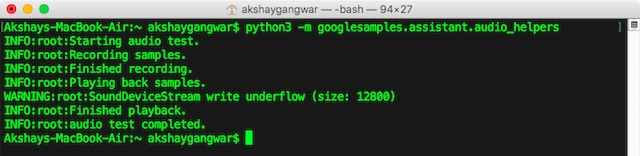
- Launch Terminal and execute the following command:
python3 -m googlesamples.assistant.audio_helpers
This will start a 5 second audio recording, which will then be played back. If you can successfully hear the playback, you can use the Google Assistant.
- To use Google Assistant on Windows, Mac and Linux, just use the following command:
python3 -m googlesamples.assistant
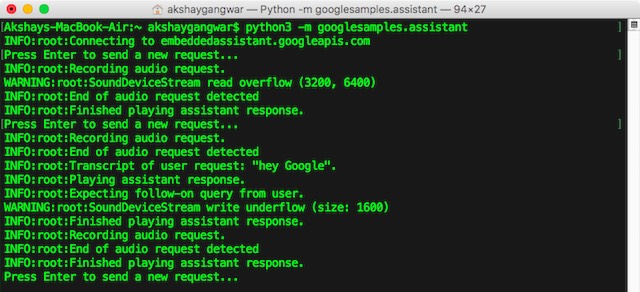 You can then start using Google Assistant on Windows, Mac and Linux. The Google Assistant API supports every command that Google Assistant supports on Android, and Google Home.
Use Google Assistant on Windows , Mac and Linux
Now that you’ve done all the required set up, it’s time to test the Google Assistant, and begin using it.
- Launch Terminal and execute the following command:
python3 -m googlesamples.assistant.audio_helpers
This will start a 5 second audio recording, which will then be played back. If you can successfully hear the playback, you can use the Google Assistant.
- To use Google Assistant on Windows, Mac and Linux, just use the following command:
python3 -m googlesamples.assistant
You can then start using Google Assistant on Windows, Mac and Linux. The Google Assistant API supports every command that Google Assistant supports on Android, and Google Home.
Get Google Assistant on Your Windows, Mac or Linux Computer
You can follow these steps to get Google Assistant on your Windows, Mac or Linux computer. While there is no GUI, and you’ll have to interact with the Google Assistant using the Terminal (or Command Prompt), it still is a fun way to get Google Assistant working on your computer. Plus, Google’s opening the Assistant API is an awesome thing, because developers can now integrate it into their apps and create awesome experiences… hopefully. All that remains to be seen, however.
Note: This method allows a user to get access to Google Assistant using the Terminal (Command Prompt on Windows), and there is no GUI involved. However, all the commands work perfectly fine.
Get Google Assistant on Your Windows, Mac or Linux Computer
You can follow these steps to get Google Assistant on your Windows, Mac or Linux computer. While there is no GUI, and you’ll have to interact with the Google Assistant using the Terminal (or Command Prompt), it still is a fun way to get Google Assistant working on your computer. Plus, Google’s opening the Assistant API is an awesome thing, because developers can now integrate it into their apps and create awesome experiences… hopefully. All that remains to be seen, however.Note: This method allows a user to get access to Google Assistant using the Terminal (Command Prompt on Windows), and there is no GUI involved. However, all the commands work perfectly fine.


Comments
Post a Comment